
WordPress is considered to be the most easy to use CMS. Everything you need to setup your WordPress website or blog can be done with a few clicks, including WordPress installation on your server using 1-Click auto installer. I personally don’t recomment auto installers, and I have already explained why I think manual WordPress install is better than automatic.
For more professional and secure WordPress installation, follow my manual WordPress installation guide – Full tutorial for beginners.
Since most of the people who are starting their blog or website usually decide to host with Bluehost or Siteground (as those tow are considered to be one of the best WordPress hosting providers), this tutorial will show you how to manually install your WordPress on Bluehost. I’ll be covering Siteground installation in one of my next tutorials.
Assuming you have already purchased a hosting with Bluehost, here are the detailed steps with images for installing WordPress on Bluehost.
Log in to your Bluehost account
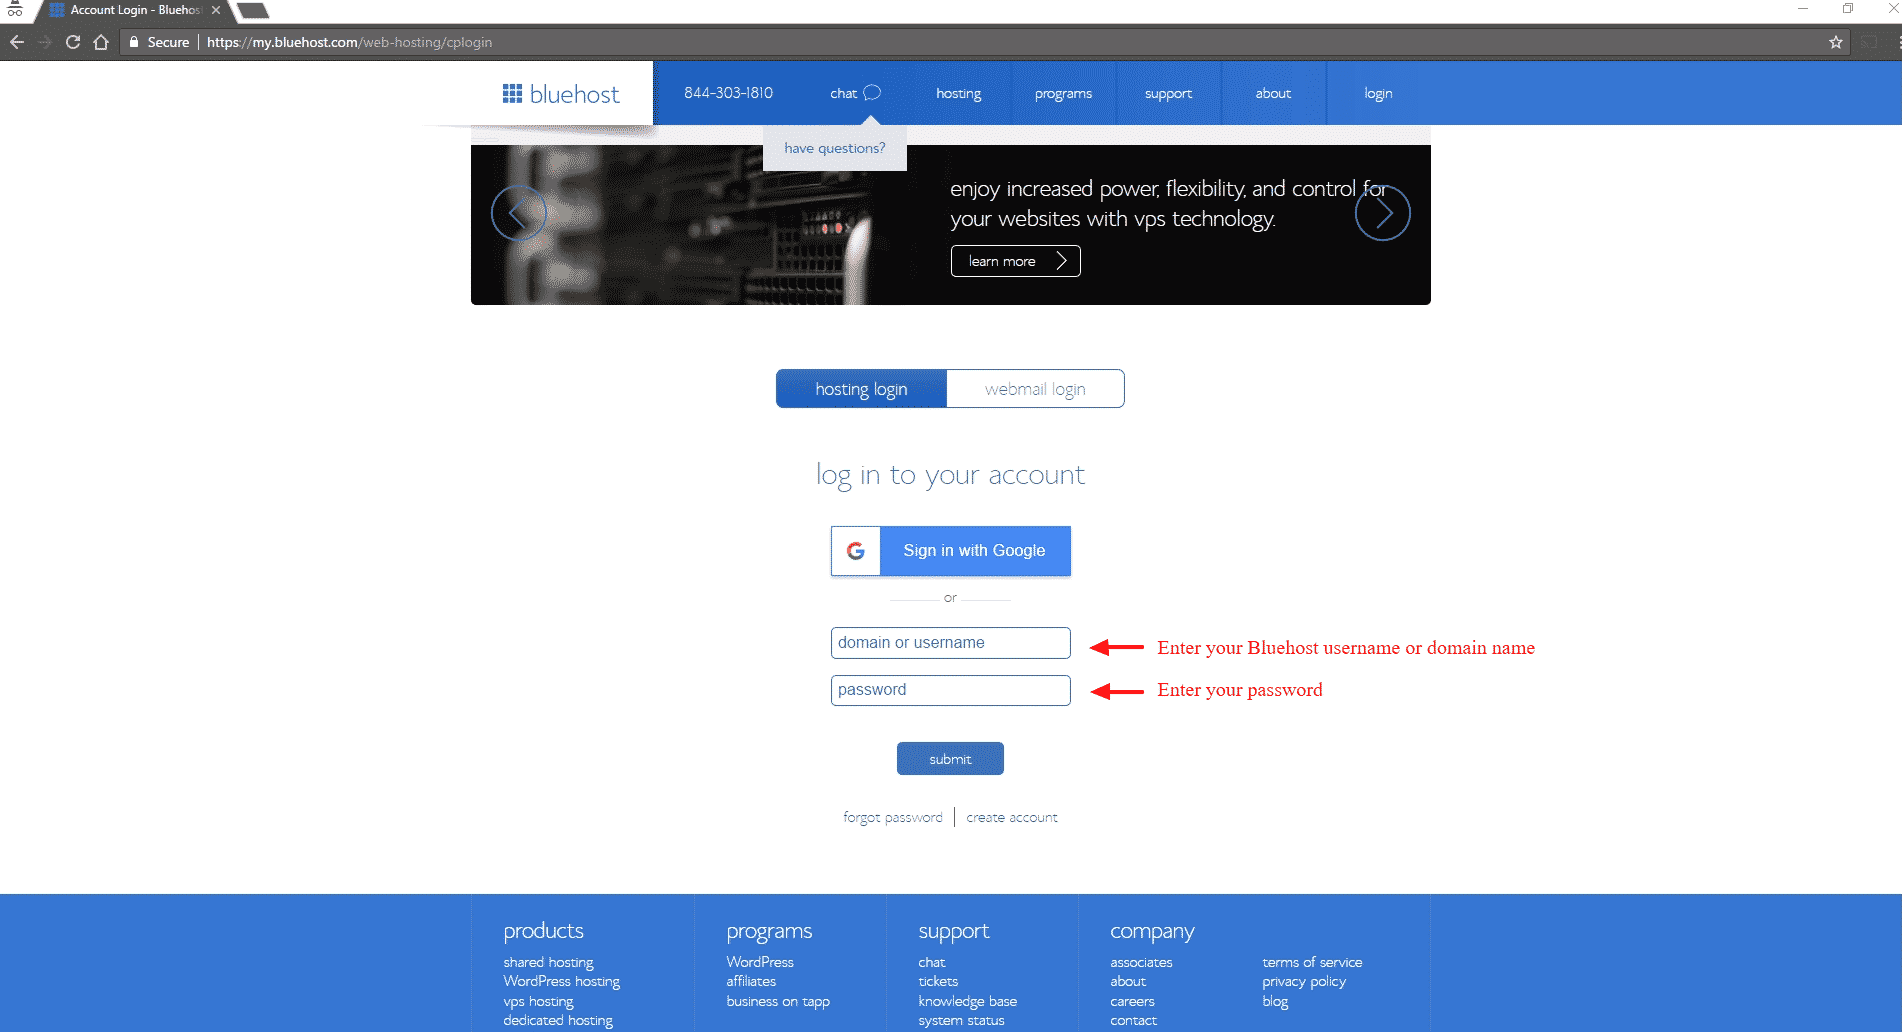
Manual WordPress installation guide – Bluehost login
You could also login directly to your cPanel by entering www.yourdomain.com/cpanel in the browsers address bar if you know you cPanel username and password.
Enter your username and password in the input fields shown on the image above.
Create your first WordPress Database
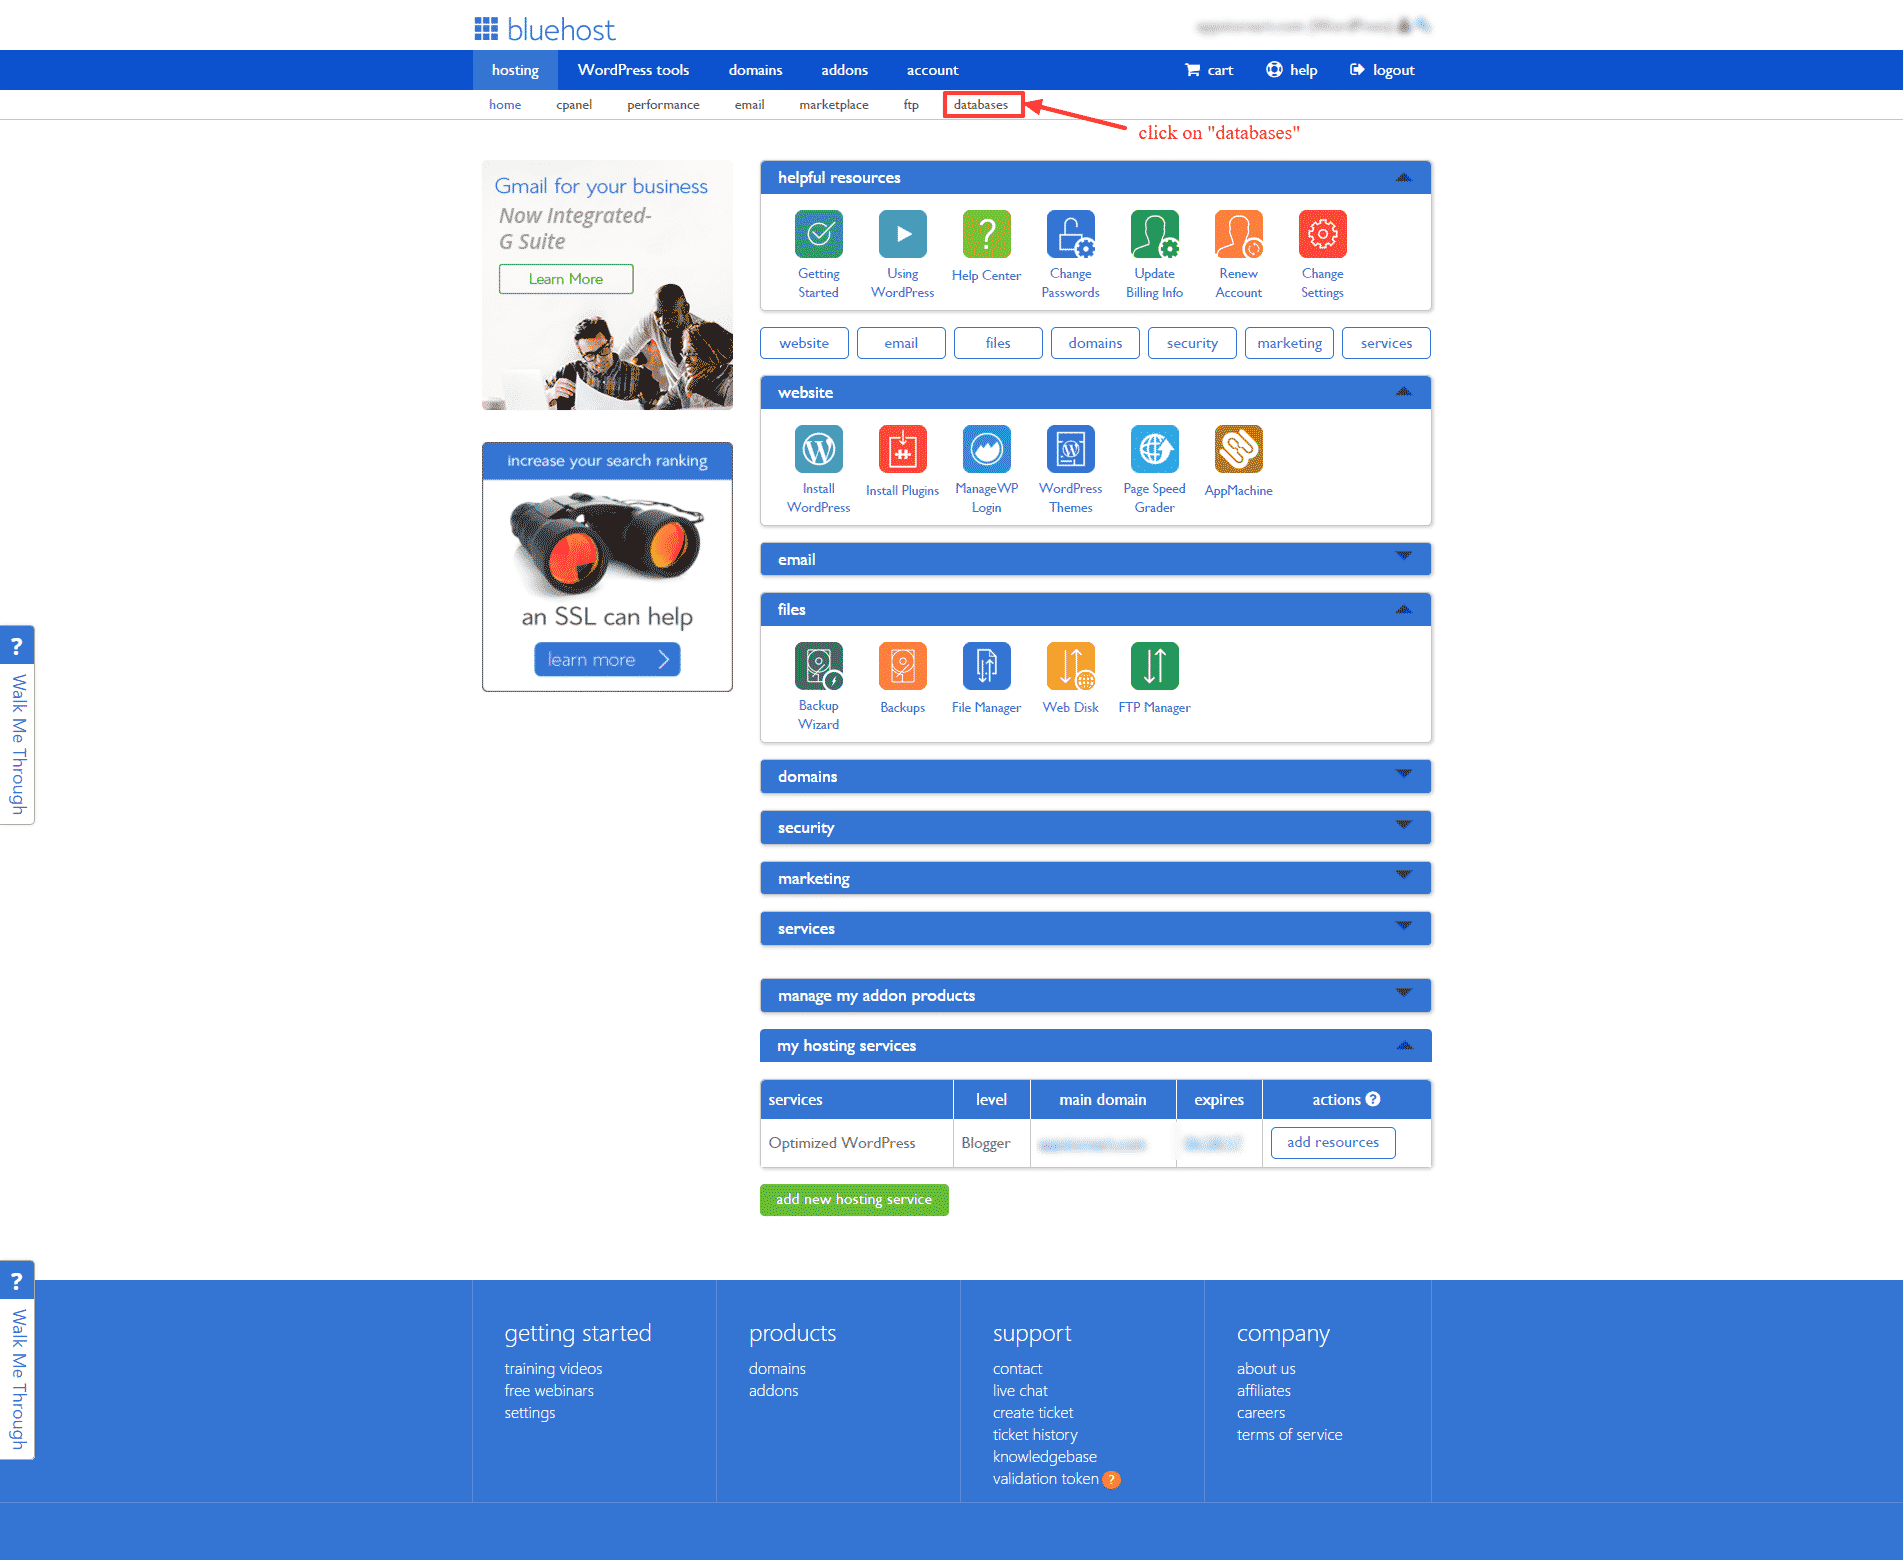
On the top menu on your dashboard, click “databases”
Once you’re connected to your Bluehost dashboard, click on “databases” from the top menu. First we will create the database and transfer WordPress installation files later, but please note that the order is not important. You may as well copy the installation files first and then create the database.
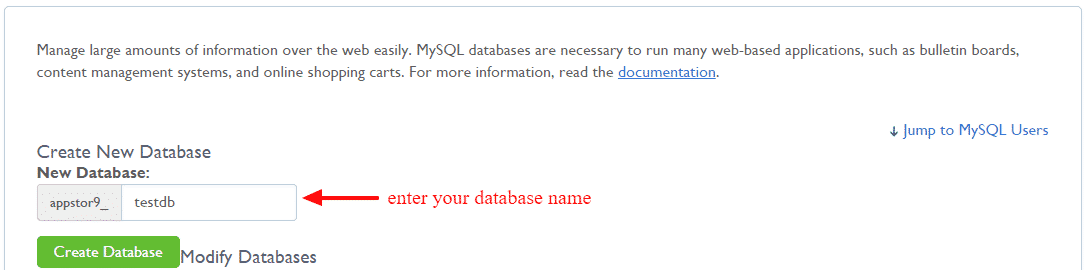
Take a note on the first part of the input field. This shows your default “first” part of the database name. It will look something similar to your shorten domain name. In the input box, enter your database name. I’ve called it testdb for this tutorial.
Once you’re set, click “Create Database”. You will see the following screen. 
Click “Go Back” to access the Databases dashboard again. You will see your newly created database in the list of databases. I have more than one already, but take a look at our created database. Noticing missing “Privileged User”? We need to create a user who will access the database.
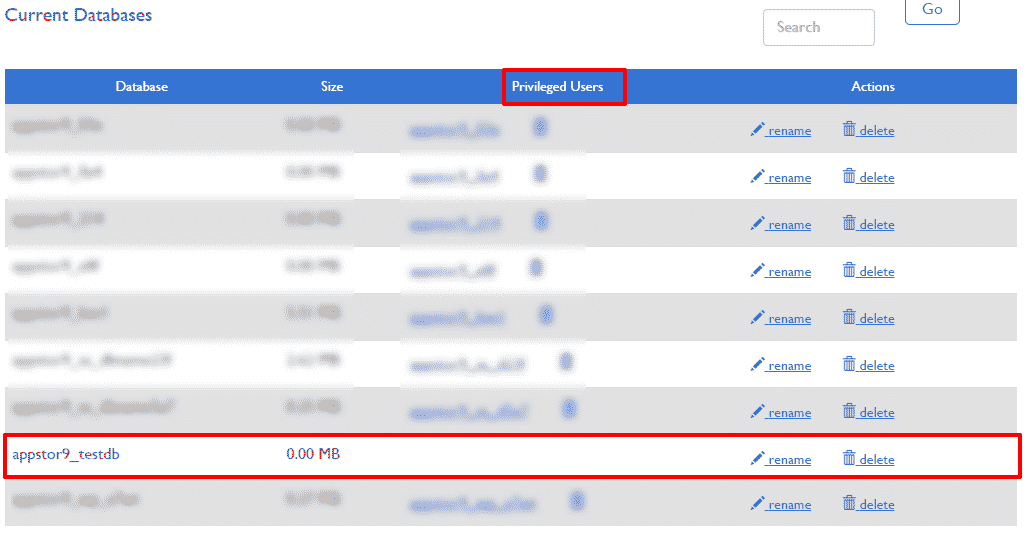
Database list
The primary function of the MySQL privilege system is to authenticate a user who connects from a given host and to associate that user with privileges on a database such as SELECT, INSERT, UPDATE, and DELETE.
Let’s create our user now.
Creating Database User
On the database dashboard, right below the database list, you will see a section called “MySql Users”. We will use this section to create a new database user.
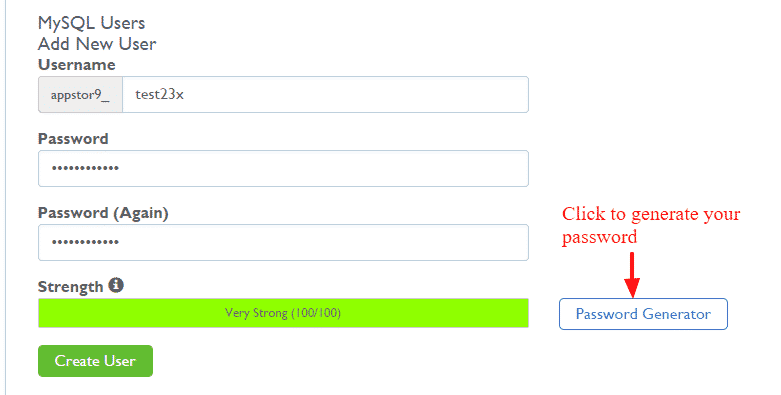
Creating database user
Enter the user name, I’ve used test23x for this tutorial purposes. You should always use hard to guess names. Optionally you can use a “Password Generator” to generate a strong random password. Click “Password Generator”, generate and copy your password to the clipboard and click “Use password”. You will see the same screen as on image above.
When you’re ready, click “Create User”. That’s it, you have created your first database user!

Successfully created database user
Adding User to Database
Now it’s time to assign our newly created user test23x to the database we created testdb .
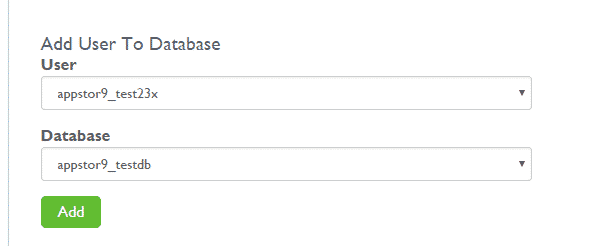
Assigning user to database
From the first dropdown, select your user. From the second dropdown, select your database and click “Add”. You will see the following screen.

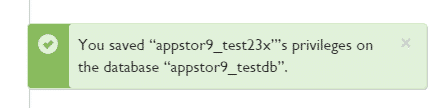
Adding user privileges
Tick “All privileges” from the top as shown on image above, and click “make changes”. Wait a few seconds and you will see this confirmation screen.
Click “Go Back” button to return to database dashboard. Now you will see your user in the database list. Well done!
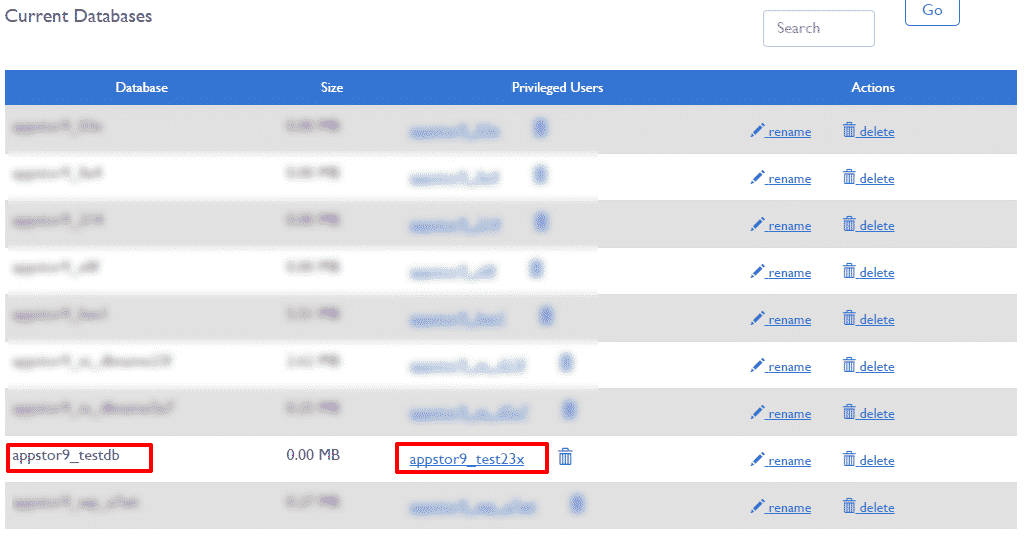
User added successfully to the database
Important: make sure you have copied your user password!!
Copying WordPress installation files
First thing you should do is download latest WordPress version. Ok, once you have downloaded WordPress there is one thing I need to mention. The zipped archive containing WordPress files is placed in a folder named “WordPress” within the zip file. You don’t normally want that. You need to extract your installation files in the root of your public_html directory. You can either extract the folder on your local computer and repack the files without the “wordpress folder”, or you can copy downloaded zip file to the server and move files after extraction. Assuming not all of you have zip software installed, I’m gonna go with second option. Copying downloaded zip file to your server.
Let’s go back to your Bluehost home dashboard and select “File manager” from the application list as shown on the image.
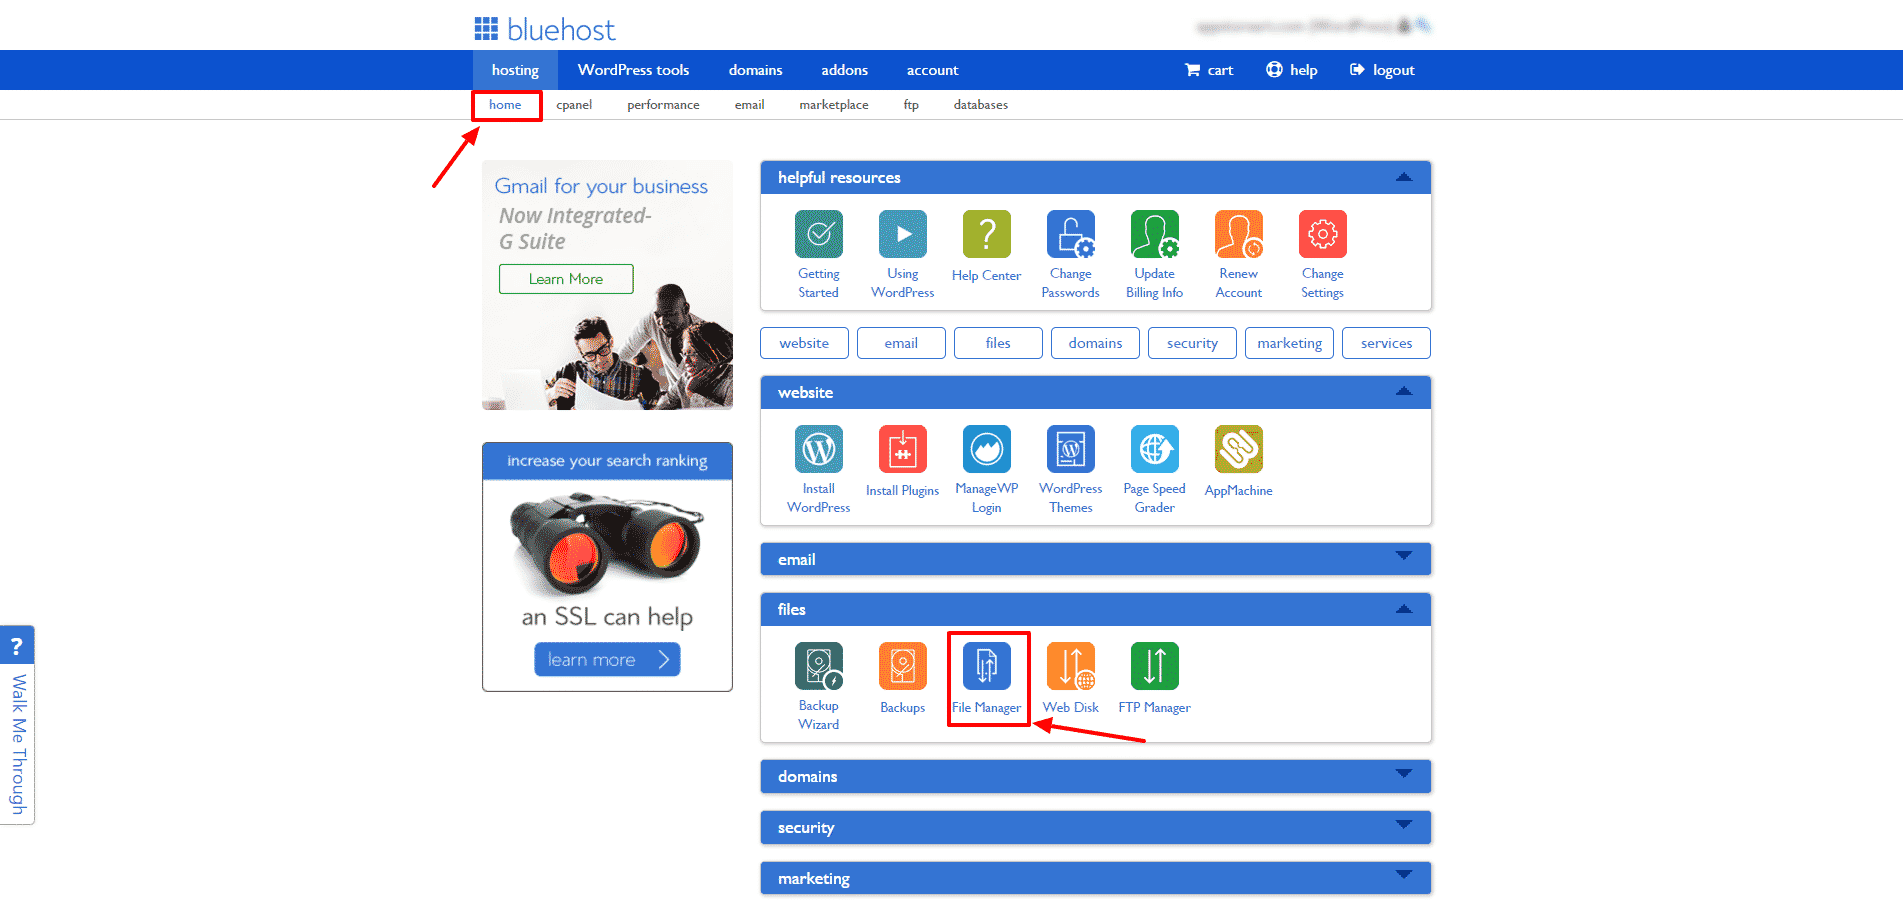
Accessing Bluehost File manager
Once clicked, a popup will appear.
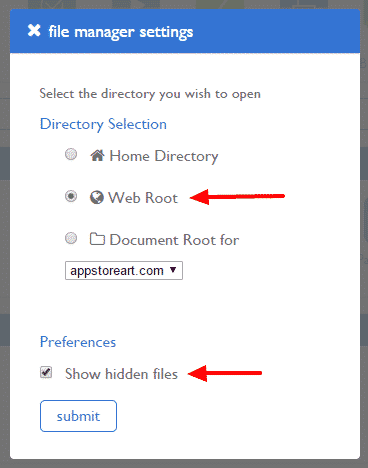
Tick Web Root from Directory Selection, and “Show hidded files” from Preferences. Click Submit. Wait a few seconds for a File Manager to be loaded. When it’s loaded, you will get the following screen.
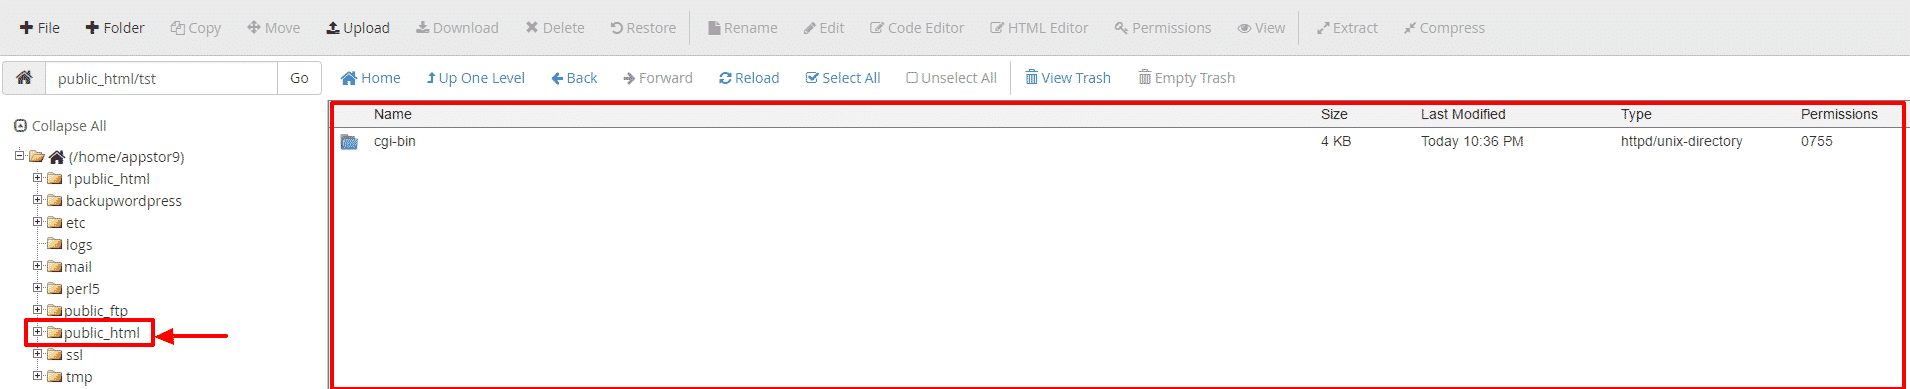
public_html directory – Currently empty
You will notice that your selected folder is public_html (Web root) and it’s currently empty. It might contain a default cgi-bin folder, if you see it – just ignore it.
Next step is uploading previously downloaded WordPress archive. If you haven’t download it yet, you can do that now by clicking on this link. Now, from the top of your File Manager, click the “Upload” button.

Click to upload WordPress archive
On the next screen, click “Select file”, locate the downloaded WordPress installation from your computer. Upload will start automatically as soon as you select your file. Wait until upload is complete and click “go back…”
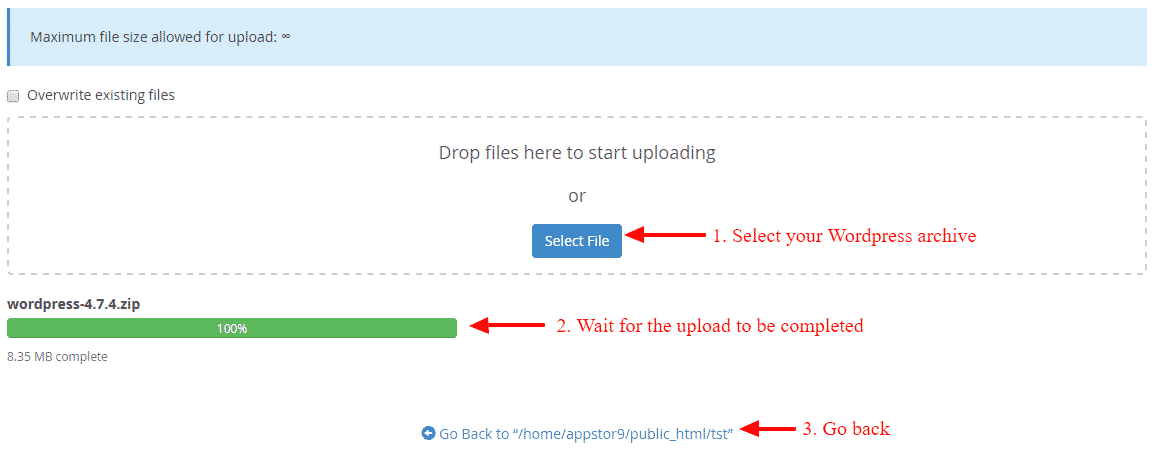
Uploading downloaded WordPress archive
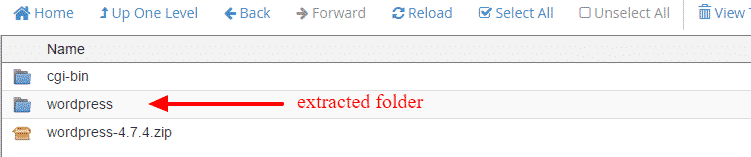
Once you click “Go Back to..”, you will see your Web root folder with successfully uploaded WordPress archive. Right click on the archive and select “Extract“. Image below.

Extracting the archive
Once your archive is extracted, you will see a newly create folder called wordpress . That folder contains your WordPress installation files. I have mentioned before that we need to move your installation files to the Web root or public_html .
Double click on the blue folder icon to access the folder content. Once you are in the folder, you will see a list of all WordPress installation files.
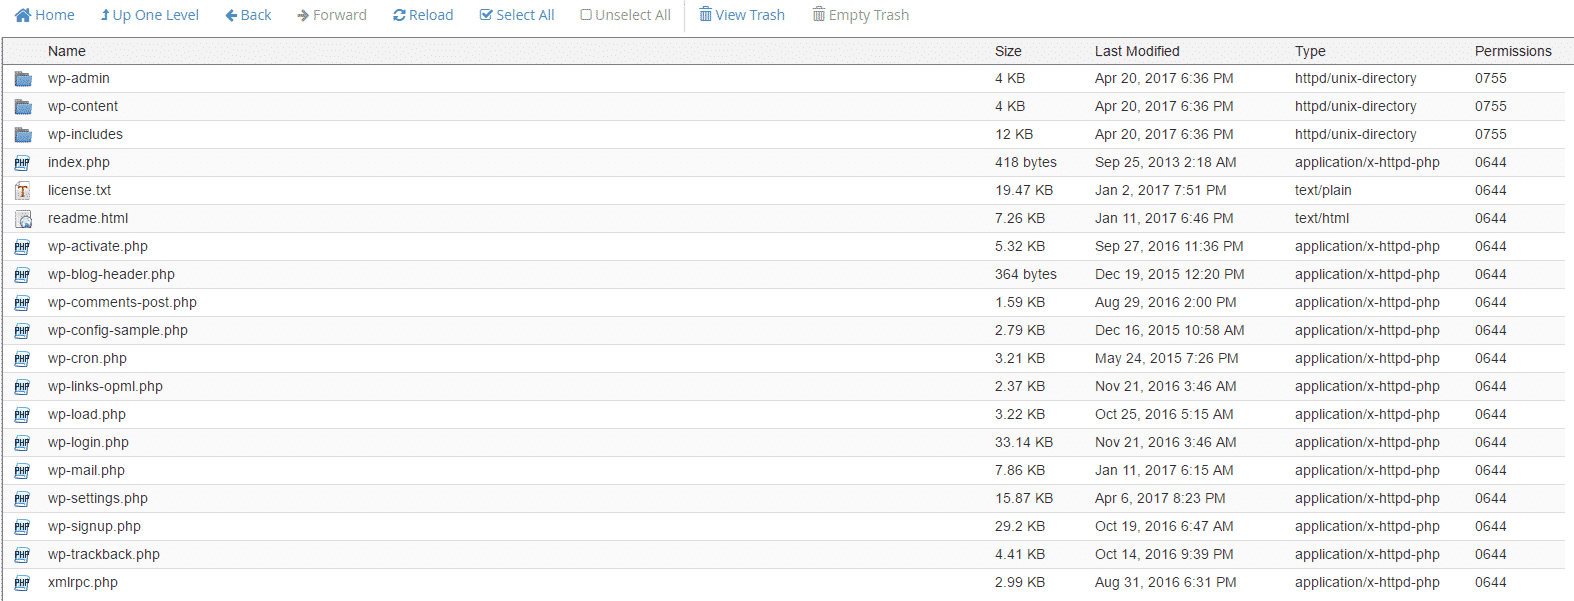
Your extracted WordPress installation files.
Now we need to move all this files to your public_html directory. To do that, select all files from this screen. You can do that by clicking on the first on the list, hold “Shift” key on your keyboard and click on the last file on the list.
When your selection is complete, it should turn blue, indicating that all files are selected. Now, from the top menu, click “Copy”.
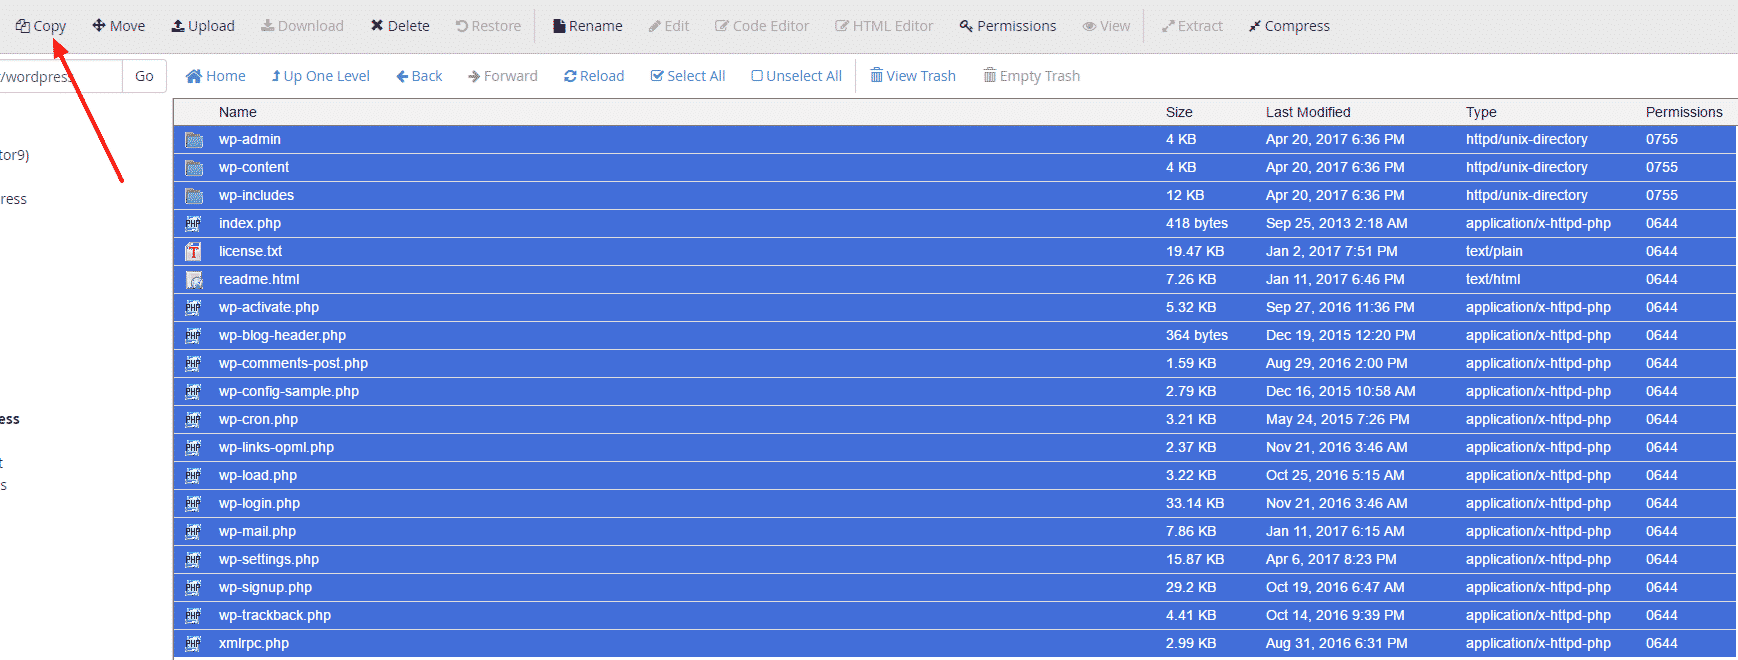
Copying installation files
Use only /public_html/ as the path and click copy.
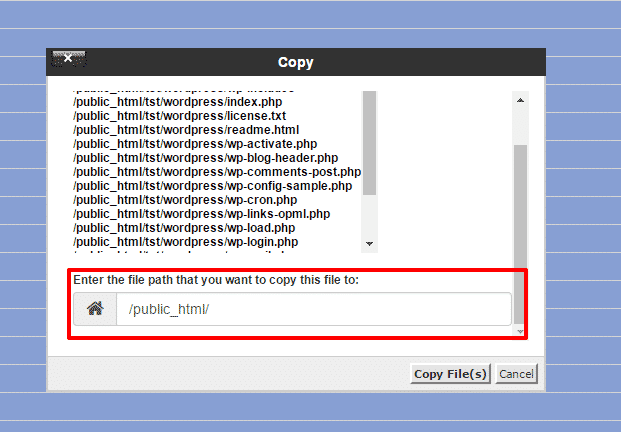
Ok, we are almost there! Now from the left panel, click on public_html and you should see your Web root folder updated with copied WordPress installation files.
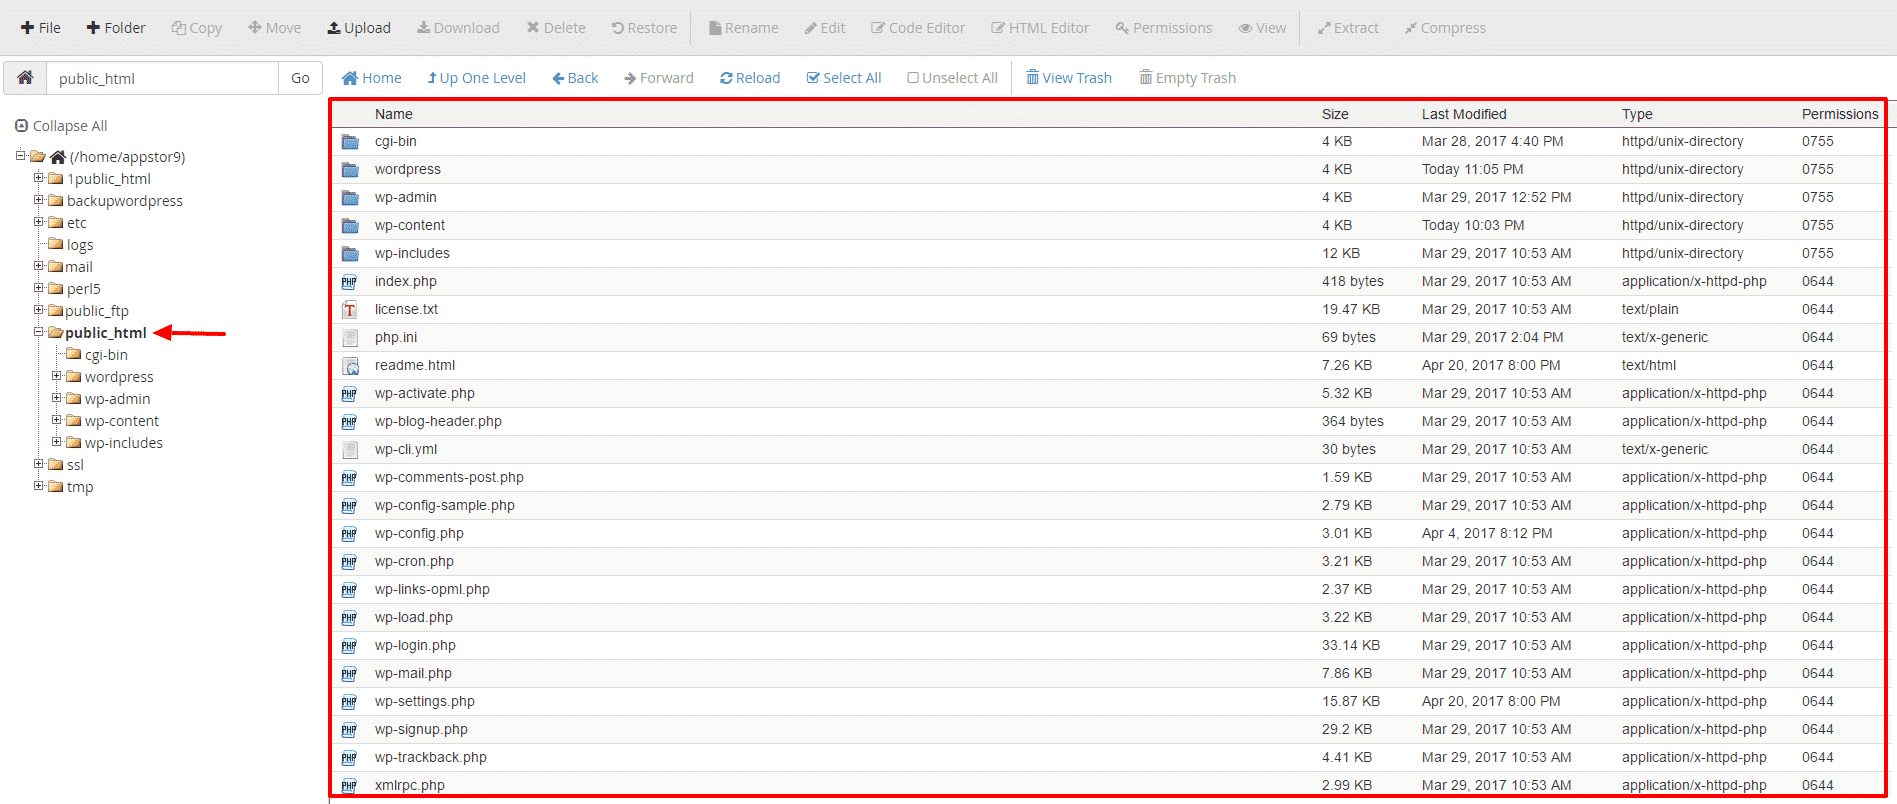
Now it is safe to delete wordpress directory in the list. To do that, right click on wordpress and click delete. You can choose to skip the trash and permanently delete the files.
Configuring your WordPress installation
The last thing we need to do is to configure your WordPress installation. This is done with wp-config-sample.php file which we will edit and save as wp-config.php file. This file holds all the information for database connection and various other data we wont be touching right now.
To edit your wp-config-sample.php , right click on it and select “Edit”. On the popup, click Edit again.

Preparing to edit wp-config-sample.php file
The content of the default file will look similar to this:
<?php
/**
 * The base configuration for WordPress
 *
 * The wp-config.php creation script uses this file during the
 * installation. You don't have to use the web site, you can
 * copy this file to "wp-config.php" and fill in the values.
 *
 * This file contains the following configurations:
 *
 * * MySQL settings
 * * Secret keys
 * * Database table prefix
 * * ABSPATH
 *
 * @link https://codex.wordpress.org/Editing_wp-config.php
 *
 * @package WordPress
 */

// ** MySQL settings - You can get this info from your web host ** //
/** The name of the database for WordPress */
define('DB_NAME', 'database_name_here');

/** MySQL database username */
define('DB_USER', 'username_here');

/** MySQL database password */
define('DB_PASSWORD', 'password_here');

/** MySQL hostname */
define('DB_HOST', 'localhost');

/** Database Charset to use in creating database tables. */
define('DB_CHARSET', 'utf8');

/** The Database Collate type. Don't change this if in doubt. */
define('DB_COLLATE', '');

/**#@+
 * Authentication Unique Keys and Salts.
 *
 * Change these to different unique phrases!
 * You can generate these using the {@link https://api.wordpress.org/secret-key/1.1/salt/ WordPress.org secret-key service}
 * You can change these at any point in time to invalidate all existing cookies. This will force all users to have to log in again.
 *
 * @since 2.6.0
 */
define('AUTH_KEY',         'put your unique phrase here');
define('SECURE_AUTH_KEY',  'put your unique phrase here');
define('LOGGED_IN_KEY',    'put your unique phrase here');
define('NONCE_KEY',        'put your unique phrase here');
define('AUTH_SALT',        'put your unique phrase here');
define('SECURE_AUTH_SALT', 'put your unique phrase here');
define('LOGGED_IN_SALT',   'put your unique phrase here');
define('NONCE_SALT',       'put your unique phrase here');

/**#@-*/

/**
 * WordPress Database Table prefix.
 *
 * You can have multiple installations in one database if you give each
 * a unique prefix. Only numbers, letters, and underscores please!
 */
$table_prefix  = 'wp_';

/**
 * For developers: WordPress debugging mode.
 *
 * Change this to true to enable the display of notices during development.
 * It is strongly recommended that plugin and theme developers use WP_DEBUG
 * in their development environments.
 *
 * For information on other constants that can be used for debugging,
 * visit the Codex.
 *
 * @link https://codex.wordpress.org/Debugging_in_WordPress
 */
define('WP_DEBUG', false);

/* That's all, stop editing! Happy blogging. */

/** Absolute path to the WordPress directory. */
if ( !defined('ABSPATH') )
	define('ABSPATH', dirname(__FILE__) . '/');

/** Sets up WordPress vars and included files. */
require_once(ABSPATH . 'wp-settings.php');
We will be replacing the following values: DB_NAME, DB_USER, DB_PASSWORD, Authentication Unique Keys and Salts and table_prefix.
In my article on Why you should choose WordPress Manual install over 1-click installer I was mentioning WordPress security and this is one part of installation where security is enhanced comparing to WordPress 1-Click installs.
Let’s change database values first! In the step 2 and step 3, we created a WordPress database, WordPress user and user password. Now you will need to paste those values instead of default ones. Let’s head back to our Bluehost database dashboard to copy the names.

You need to copy full database name appstor9_testdb and full user appstor9_test23x . You have previously copied your user password to a safe place.
Go back to the editor with wp-config-sample.php opened and replace the mentioned values. Watch out for the strings!! Your replaced values needs to be inside of the strings.
Let’s see how it’s going to look after replacement.
define(‘DB_NAME’, ‘database_name_here’); becomes define(‘DB_NAME’, ‘appstor9_testdb’);
define(‘DB_USER’, ‘username_here’); becomes define(‘DB_USER’, ‘appstor9_test23x’);
define(‘DB_PASSWORD’, ‘password_here’); becomes define(‘DB_PASSWORD’, ‘yourPassword’);
Note that yourPassword is the one you created for your user. Next important part is to replace Authentication Unique Keys and Salts which by default are empty.
Using unique WordPress authentication keys and sales is very important to ensure a more secure WordPress. Also known as the WordPress security keys, they are used by WordPress to ensure better encryption of information stored in a user’s cookies when logged in to a WordPress website or blog. They also have better support for when visiting the WordPress dashboard over SSL.
To generate new Salt Keys, visit Salt Key generator. Once you visit this link, you will see the next screen.

Select all lines and copy them to your clipboard CTRL+C. Back in your editor select lines 49 – 56 (line numbers may be different depending on WP version), and paste the newly created keys over the old ones.
Finally, change $table_prefix on line 66 to something harder to guess, like: x23tt_ . After making all the changes your file should look like this:
<?php
/**
 * The base configuration for WordPress
 *
 * The wp-config.php creation script uses this file during the
 * installation. You don't have to use the web site, you can
 * copy this file to "wp-config.php" and fill in the values.
 *
 * This file contains the following configurations:
 *
 * * MySQL settings
 * * Secret keys
 * * Database table prefix
 * * ABSPATH
 *
 * @link https://codex.wordpress.org/Editing_wp-config.php
 *
 * @package WordPress
 */

// ** MySQL settings - You can get this info from your web host ** //
/** The name of the database for WordPress */
define('DB_NAME', 'appstor9_testdb');

/** MySQL database username */
define('DB_USER', 'appstor9_test23x');

/** MySQL database password */
define('DB_PASSWORD', 'yourPassword');

/** MySQL hostname */
define('DB_HOST', 'localhost');

/** Database Charset to use in creating database tables. */
define('DB_CHARSET', 'utf8');

/** The Database Collate type. Don't change this if in doubt. */
define('DB_COLLATE', '');

/**#@+
 * Authentication Unique Keys and Salts.
 *
 * Change these to different unique phrases!
 * You can generate these using the {@link https://api.wordpress.org/secret-key/1.1/salt/ WordPress.org secret-key service}
 * You can change these at any point in time to invalidate all existing cookies. This will force all users to have to log in again.
 *
 * @since 2.6.0
 */
define('AUTH_KEY',         'hlgGqQ&09,_^ d}RxlW2]!yG,21cBiBDH0|by68KQs.$VJ[{hmFv+ 7]]-%`ETv/');
define('SECURE_AUTH_KEY',  'YQCvNaK%us~Jv9,/+zBkr^<M)b,}iw/+5UAt4gS7<M]2BKfoP0F0QD)GwfAH&-[r');
define('LOGGED_IN_KEY',    '?,&_7}6T;n+tDwRq.4.TZIpDqCM5uy1N-o=M$mE&#^u`aHCZy{*U;@*K8d3%L43;');
define('NONCE_KEY',        'V{^H`tDP6<#<?,eBOu;)Whf!Y+glHV)f(NiRJa;a6zvQ7Q~Gn&.a(S*+e]N, _O,');
define('AUTH_SALT',        'Hd5X*H[Fm+,4wOWu8ub`_F7OTk.}YJ4OTIQasud-|j, ;Dpy&TRqlqR0E~$<~`x.');
define('SECURE_AUTH_SALT', '-[#3S87>?|cwU|bP,_y|3ckX!n;P9SNT)B}+LjR BXl[(5.nETuj^nw/u+nJ@+[N');
define('LOGGED_IN_SALT',   'DF~pI2zuw@akhd3u%|-}`FQq[f{CVfQ_k1/BXL86zsG8IX9AVIX~UB%sj;R%*Hk-');
define('NONCE_SALT',       'H&>YPS0rzvDi#WE29bf_|+Ip<H#mO{Y0~D6.u4o#h+>qjw_LE/5:nK^FY9o^-*s3');

/**#@-*/

/**
 * WordPress Database Table prefix.
 *
 * You can have multiple installations in one database if you give each
 * a unique prefix. Only numbers, letters, and underscores please!
 */
$table_prefix  = 'x23tt_';

/**
 * For developers: WordPress debugging mode.
 *
 * Change this to true to enable the display of notices during development.
 * It is strongly recommended that plugin and theme developers use WP_DEBUG
 * in their development environments.
 *
 * For information on other constants that can be used for debugging,
 * visit the Codex.
 *
 * @link https://codex.wordpress.org/Debugging_in_WordPress
 */
define('WP_DEBUG', false);

/* That's all, stop editing! Happy blogging. */

/** Absolute path to the WordPress directory. */
if ( !defined('ABSPATH') )
	define('ABSPATH', dirname(__FILE__) . '/');

/** Sets up WordPress vars and included files. */
require_once(ABSPATH . 'wp-settings.php');
Now it’s time to save your file as wp-config.php . To do that, from the top left input box delete the wp- part from the filename. From this /home/appstor9/public_html/wp-config-sample.php change to /home/appstor9/public_html/wp-config.php and hit “Save Changes”.
You should see your new file wp-config.php inside your Web Root folder.
Accessing WordPress for the first time
Assuming you have followed all the steps above, it’s time to see our WordPress installation for the first time! Enter your domain in the browser URL and append it with wp-admin yourdomain.com/wp-admin . You will see WordPress installation screen.
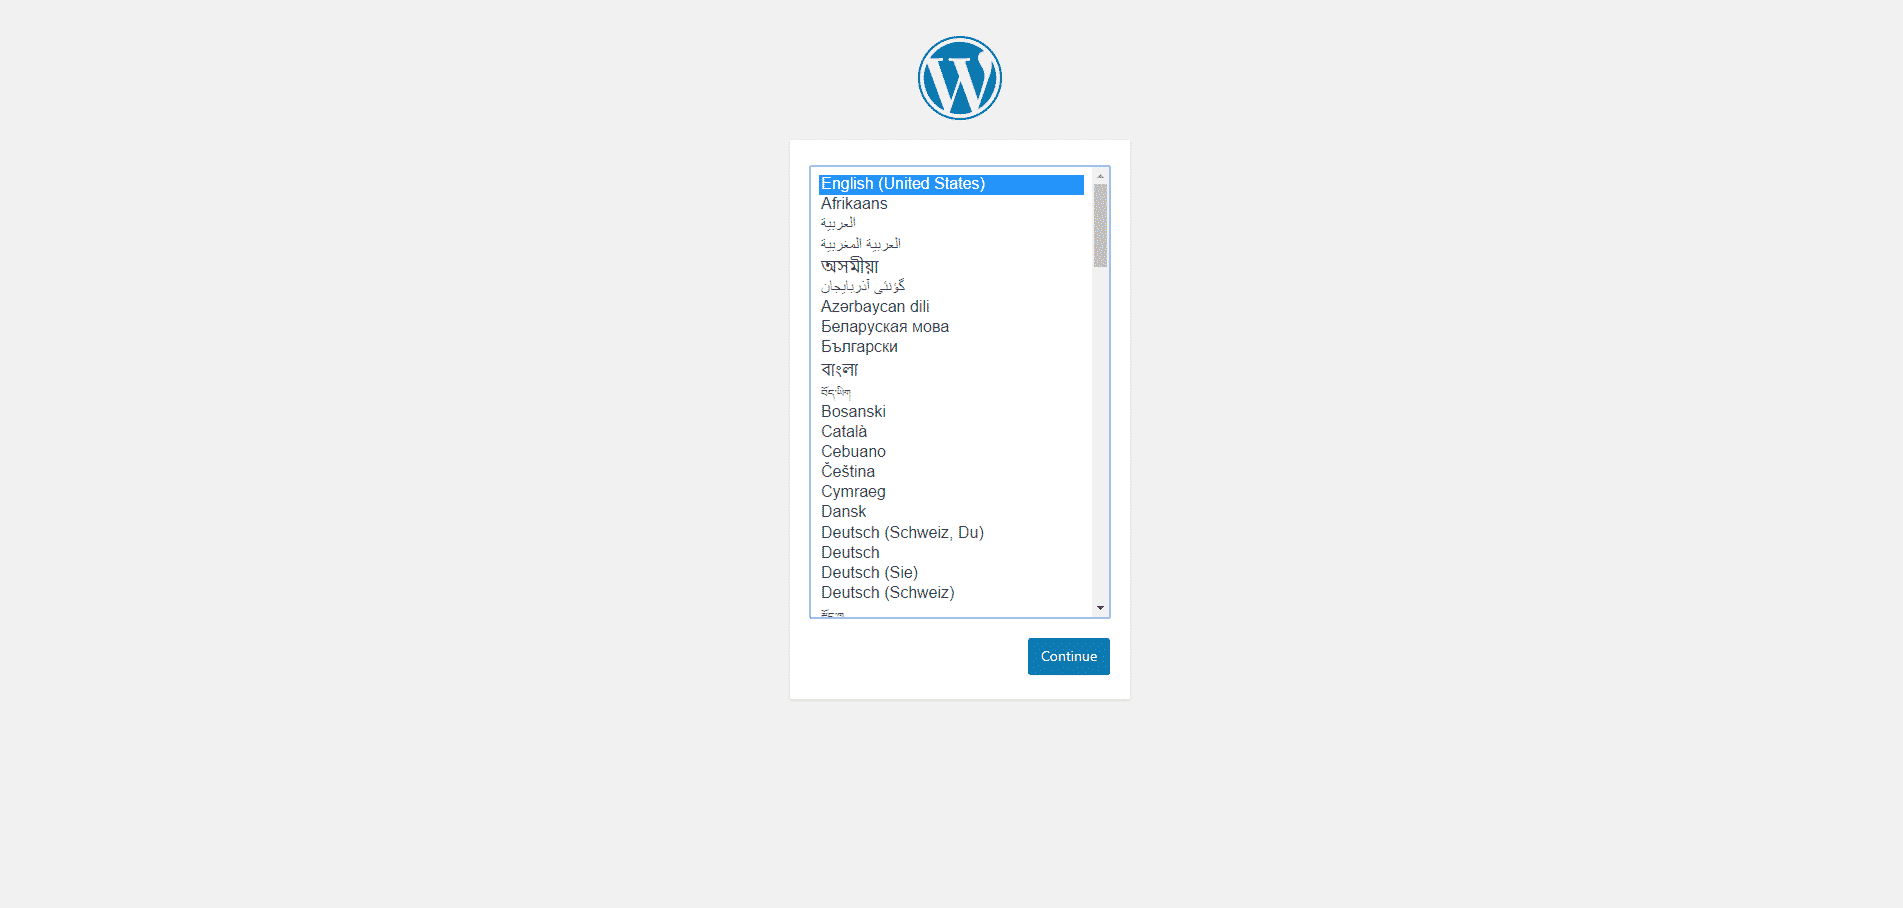
WordPress installation screen
Select your language and click continue.
WordPress installation screen
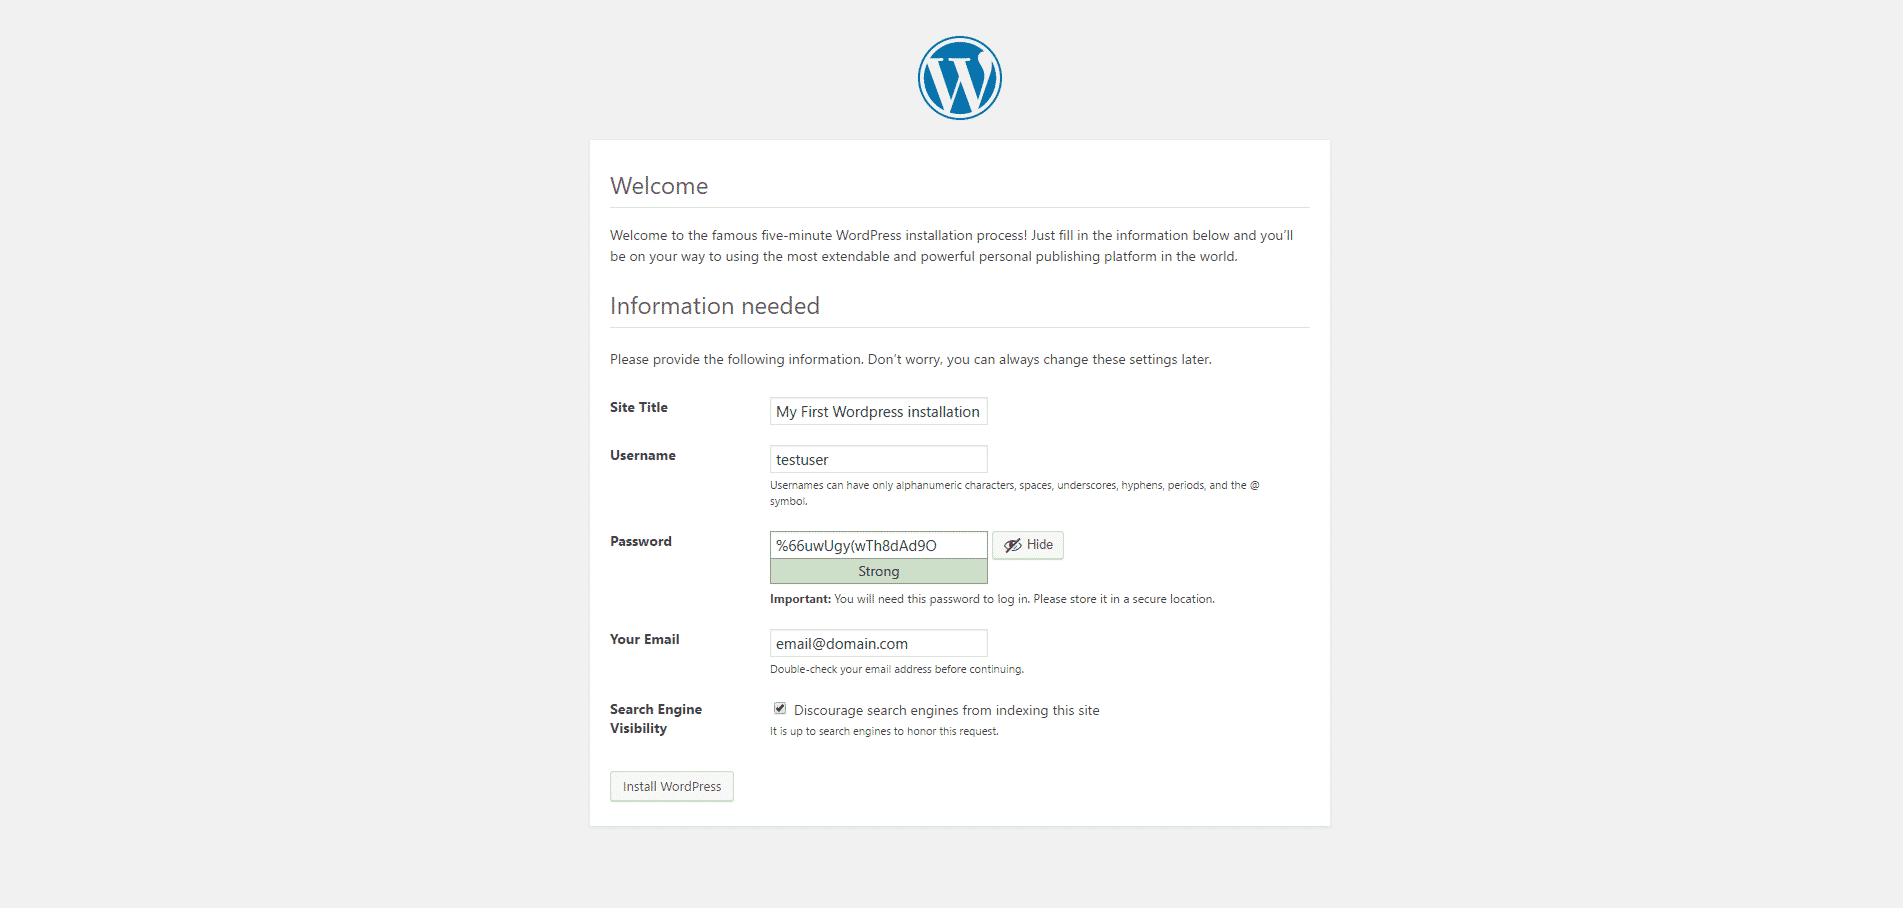
Fill in your data (it can be changed later on) and make sure you tick “Search engine visibility”. If left unticked, crawlers will start crawling your site. By the time you setup your site, crawlers may already index some URLs that doesn’t exist any more and were used while designing your site.
Log in to your WordPress installation and start designing!
Congratulations, you have manually installed WordPress on Bluehost hosting!

Heather
May 9, 2017 | 10:15 pm
Awesome tutorial! Thanks
Pammy
May 9, 2017 | 11:30 pm
Super awesome way to make lives easier! a very good tutorial!
Hannah
May 10, 2017 | 1:50 am
This was great information that I have yet to find in a blog. I like that you dive deeper into the manual wordpress install then I have read.
Sonja Josipovic
May 10, 2017 | 8:14 am
Great guide! Very useful!
http://www.stylequest.se/
Perla
May 10, 2017 | 8:23 am
Great tutorial, but I don’t use any of them, Bluehost or Sitegroud, for hosting my wordpress blog.
Jalil Mehar
May 11, 2017 | 8:38 am
Great tutorials.Very helpful thanks for sharing